Like the alchemist turning base metals into gold, you can transform humble taro roots into crispy, golden chips with the magic of an air fryer. Start by peeling and slicing the taro thinly, ensuring uniformity for even cooking. Soak the slices to remove excess starch, then pat them dry before tossing with oil and your favorite seasonings. Preheat your air fryer, arrange the slices in a single layer, and let the machine work its wonders. But the real secret lies in the timing—too short, and they're limp; too long, and they burn. What's the perfect balance? Keep going to find out.
Key Takeaways
- Peel and slice taro roots thinly (1/8-inch) using a mandoline for even cooking and crispiness.
- Soak taro slices in cold water for 30 minutes to remove starch, then pat dry thoroughly.
- Toss dried taro slices with oil and seasonings like salt, paprika, or garlic powder for flavor.
- Air fry at 350°F in a single layer for 10-12 minutes, flipping halfway, until golden and crispy.
- Cool chips completely before storing in an airtight container to maintain crispiness.
Gather Your Ingredients and Tools
Before you plunge into making air fryer taro chips, you'll need to gather a few key ingredients and tools to make certain the process goes smoothly. Start with ingredient selection: grab fresh taro roots, which should feel firm and heavy for their size. You'll also need a high-quality oil like avocado or coconut, salt, and any seasonings you love—paprika or garlic powder work wonders. For tool preparation, confirm your air fryer is clean and ready to go. A mandoline slicer will help you achieve those perfectly thin, even slices, while a mixing bowl and paper towels are essential for prepping the taro. Don't forget a pair of tongs for flipping the chips mid-cook. Trust me, having everything within arm's reach makes the process a breeze.
Prepare the Taro Root
Once you've gathered your ingredients and tools, it's time to tackle the taro root. Start with taro selection—look for firm, unblemished roots with smooth skin, as they'll yield the best chips. I once picked a taro that felt slightly soft, and it turned out mushy inside—lesson learned! Rinse the taro under cool water to remove any dirt. Now, grab a sturdy peeler for root peeling. Taro skin can be tough, so work carefully to avoid wasting the flesh. I recommend peeling over a cutting board to catch any stray bits. Once peeled, rinse the taro again to remove any lingering dirt or sap. Pat it dry with a clean towel—moisture can make slicing tricky. Now, you're ready to move on to the next step.
Slice the Taro Thinly and Evenly
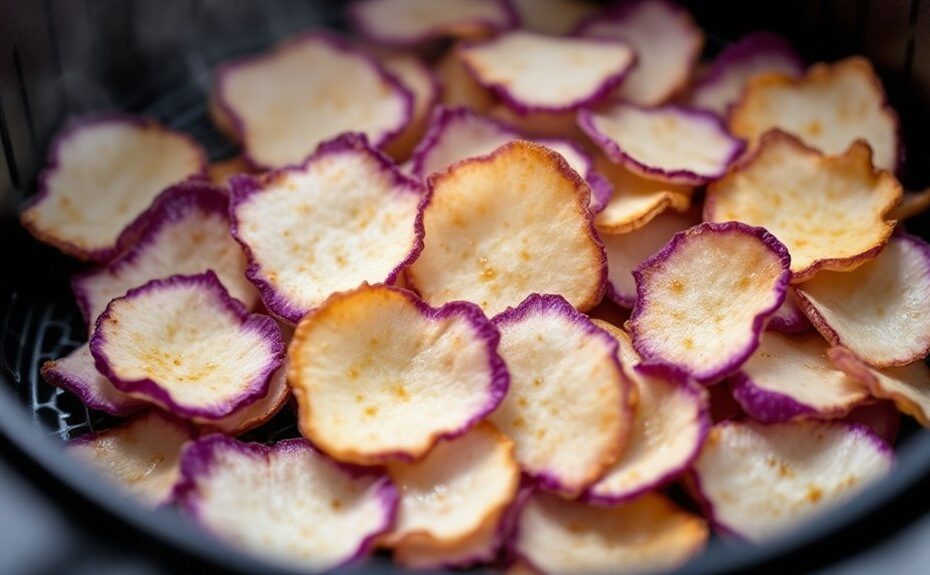
Grab a mandoline slicer to make your life easier—it's a game-changer for getting those taro slices paper-thin and perfectly even. Aim for slices about 1/8-inch thick; too thick, and they won't crisp up, too thin, and they'll burn. I learned the hard way that uneven slices lead to some chips being done while others are still soggy, so take your time and keep it consistent!
Use a Mandoline Slicer
To achieve perfectly crisp taro chips, you'll want to slice the taro as thinly and evenly as possible, and a mandoline slicer is your best tool for the job. Start by securing the mandoline on a stable surface and adjusting the blade to your desired thickness—aim for about 1/16 inch for that ideal crunch. Always use the hand guard for mandoline safety; it's easy to get carried away, but trust me, a slip can ruin your day. Hold the taro firmly and glide it smoothly across the blade using steady, even pressure. I learned the hard way that rushing leads to uneven slices, so take your time. These slicing techniques guarantee each chip cooks uniformly, giving you that satisfying, golden crispiness every time.
Maintain Consistent Thickness
Maintaining consistent thickness is key to achieving perfectly crisp taro chips. If your slices vary, some will burn while others stay soggy. Aim for uniform slicing, about 1/8-inch thick, to guarantee even cooking. I learned this the hard way when my first batch came out uneven—some chips were golden, others raw. Use a mandoline slicer for precision, adjusting the blade to your desired thickness. If you're slicing by hand, take your time and check each piece for thickness consistency. A ruler or a coin can help you gauge the size. Remember, thin slices crisp up better, but don't go too thin or they'll burn. Consistent thickness means every chip will turn out golden and crunchy, just like you want.
Soak the Taro Slices to Remove Starch
After slicing the taro, you'll want to soak the pieces in cold water to remove excess starch, which can make the chips gummy instead of crisp. This is one of the most effective starch removal techniques, and it's super simple. I've found that soaking the slices for at least 30 minutes works best, but if you're short on time, even 15 minutes can help. For the crispiest results, though, I recommend sticking to the full half-hour. You'll notice the water turning cloudy as the starch releases—this is a good sign! Swirl the slices occasionally to guarantee even starch removal. Trust me, skipping this step can lead to unevenly cooked chips, and nobody wants that. Once soaked, you're one step closer to perfectly crisp taro chips.
Pat Dry the Slices Thoroughly
Once the taro slices have soaked and the starch has been removed, it's crucial to pat them dry thoroughly. Moisture removal is key to achieving that perfect crispiness in your air fryer taro chips. I learned this the hard way when my first batch turned out soggy because I skipped this step. Use a clean kitchen towel or paper towels to gently press each slice, ensuring no water remains. For even better results, let them air-dry for 10-15 minutes after patting. This extra step helps the drying techniques work more effectively, preventing steam from forming during cooking. Trust me, taking the time to dry them properly makes all the difference—your chips will come out golden and crunchy, just like you want them.
Season the Taro Chips to Taste
To elevate your taro chips from simple to sensational, seasoning is where you can get creative. Start by tossing the dried taro slices in a light drizzle of olive oil—this helps the seasoning stick. Then, experiment with flavor combinations that excite your palate. A classic mix of sea salt and cracked black pepper never disappoints, but don't shy away from bold spice blends like smoked paprika, garlic powder, and a pinch of cayenne for a kick. For a sweet twist, try cinnamon and sugar or a sprinkle of chili-lime seasoning for tangy heat. I once added a dash of curry powder, and it was a game-changer. Remember, less is more—over-seasoning can overpower the taro's natural nutty flavor. Taste as you go and adjust to your liking!
Preheat the Air Fryer
Set your air fryer to 350°F—it's the sweet spot for crispy taro chips without burning them. Let it preheat for about 3 minutes; I've found this gives the perfect head start for even cooking. Trust me, skipping this step can leave your chips uneven, so don't rush it!
Optimal Temperature Setting
Before you start slicing taro for your chips, it's crucial to get your air fryer preheated to the right temperature. Set your air fryer to 350°F (175°C) for the best results. This temperature control guarantees your chips cook evenly without burning, while the heat distribution keeps them crispy. I've found that going higher can scorch the edges, and lower temps leave them soggy. Trust me, I learned this the hard way after a batch turned out half-raw and half-charred! The 350°F sweet spot gives you that perfect golden crunch. Make sure your air fryer reaches this temperature before adding the taro slices—it's a game-changer for consistency. Once preheated, you're ready to achieve chip perfection.
Preheating Time Duration
While preheating might seem like an extra step, it's absolutely essential for getting your taro chips crispy and evenly cooked. I learned this the hard way when I skipped it once—my chips came out soggy and uneven. Preheat your air fryer to 350°F for about 3-5 minutes. This short wait guarantees the cooking chamber reaches the right temperature, giving your chips a head start. The preheating benefits are undeniable: it locks in crispiness and reduces overall cooking time, which actually boosts energy efficiency. Plus, you'll avoid the frustration of undercooked or burnt spots. Trust me, those few minutes make all the difference. Once preheated, your air fryer is ready to work its magic, turning thinly sliced taro into golden, crunchy perfection.
Arrange the Chips in the Air Fryer Basket
To guarantee your taro chips cook evenly and crisp up perfectly, you'll want to arrange them in a single layer in the air fryer basket, leaving a little space between each slice. Proper basket arrangement is key—overcrowding will trap steam and leave you with soggy chips instead of the crispy crunch you're after. I learned this the hard way when I piled them too close together, and they ended up unevenly cooked. Take your time spacing chips out; it's worth the extra effort. If you've got more slices than your basket can handle, work in batches. Trust me, patience pays off here. A well-organized basket guarantees hot air circulates freely, giving you that golden, crispy texture you're craving.
Cook and Monitor for Crispy Perfection
Once your taro slices are neatly arranged in the air fryer basket, set the temperature to 350°F and let the magic begin. Start with a cooking time of 10 minutes, but don't walk away—these chips need your attention. Halfway through, shake the basket to guarantee even crispiness. I learned the hard way that skipping this step leads to uneven browning. After 10 minutes, check the crispiness level. If they're not golden and crunchy, add 2-3 more minutes, but keep a close eye to avoid burning. Trust me, patience pays off. When they're perfectly crisp, remove them immediately and let them cool. They'll firm up as they sit, giving you that satisfying crunch you're after. Adjust the cooking time slightly next batch if needed—every air fryer is different!
Disclosure: As an Amazon Associate, I earn from qualifying purchases.