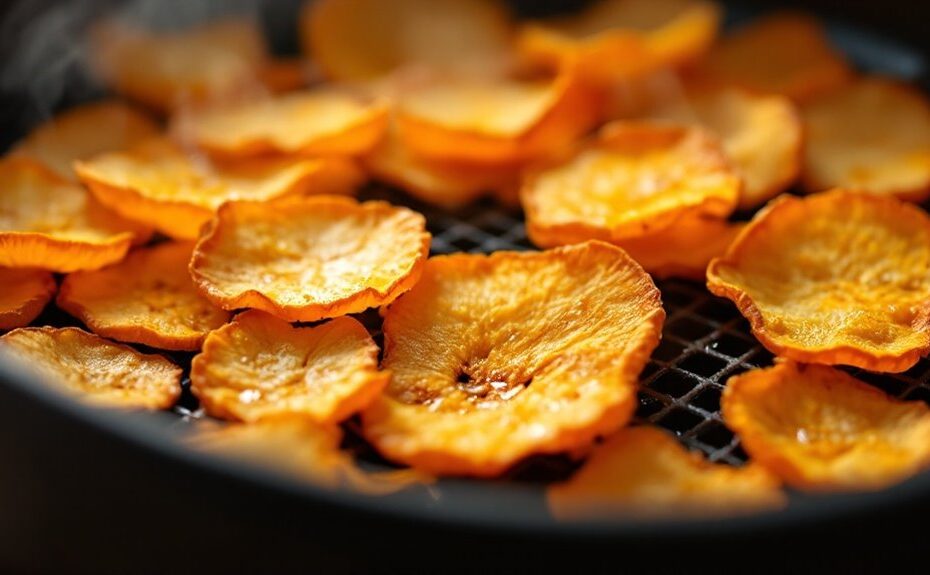
You've probably never tasted pumpkin chips so good they'll make you question every snack you've ever had. To create these crispy delights, you'll need to start with the right pumpkin and slice it into paper-thin pieces. Season them lightly, then let your air fryer work its magic. But here's the catch: the secret to perfect chips lies in a step so simple, yet so often overlooked. If you're ready to elevate your snack game, there's a trick to ensuring they come out golden and crunchy every time—and it's not what you might expect.
Key Takeaways
- Choose small sugar pumpkins, peel, and slice into thin, uniform pieces for even crisping in the air fryer.
- Season pumpkin slices with olive oil and spices like cinnamon or smoked paprika for sweet or savory flavors.
- Preheat the air fryer to 375°F and arrange slices in a single layer to ensure even cooking and crispiness.
- Cook for 10-15 minutes, shaking the basket halfway, until chips are golden and crispy.
- Store cooled chips in an airtight container to maintain crispiness and serve immediately for best texture.
Choosing the Right Pumpkin
When selecting a pumpkin for making chips, it's important to choose one that's firm, small, and sweet. Look for sugar pumpkins or pie pumpkins, as these pumpkin varieties are naturally sweeter and have a smoother texture, perfect for crisp chips. Avoid larger carving pumpkins—they're too watery and lack the rich flavor you need. Seasonal availability plays a role too; fall is the ideal time to find fresh, high-quality pumpkins at their peak. Check farmers' markets or grocery stores for locally grown options, as they're often fresher and more flavorful. A good pumpkin should feel heavy for its size, with no soft spots or blemishes on the skin. Choosing the right pumpkin guarantees your chips will have the perfect balance of sweetness and crunch.
Preparing the Pumpkin for Slicing
Start by selecting a firm, small sugar pumpkin for ideal texture and flavor. Wash the pumpkin thoroughly under cool water, then carefully peel off the skin using a sharp vegetable peeler or knife to avoid waste. Once prepped, slice the pumpkin into thin, uniform pieces to guarantee they crisp up evenly in the air fryer.
Selecting the Right Pumpkin
To make the best pumpkin chips, you'll want to choose a small sugar pumpkin, also known as a pie pumpkin, as its flesh is sweeter, denser, and less fibrous than larger varieties. These pumpkins are ideal for chips because they crisp up beautifully in the air fryer. Avoid larger carving pumpkins, as they tend to be watery and lack the rich flavor you're after. Sugar pumpkins are typically available during the fall, aligning with their seasonal availability, so plan to make your chips during this time for the freshest results. When selecting one, look for a firm pumpkin with smooth, unblemished skin and a deep orange color. This guarantees the best texture and taste for your homemade chips.
Cleaning and Peeling Techniques
After selecting the perfect sugar pumpkin, you'll need to clean and peel it to prepare for slicing. Start by rinsing the pumpkin under cool water, scrubbing gently with a vegetable brush to remove dirt—this is a key step in your cleaning methods guide. Pat it dry with a clean towel. Next, use a sharp vegetable peeler or a sturdy knife to remove the skin. Work carefully, following the pumpkin's curves to avoid wasting flesh. If the skin feels tough, consider microwaving the pumpkin for 1-2 minutes to soften it slightly. Remember, your pumpkin selection tips matter here: a firm, smooth surface makes peeling easier. Once cleaned and peeled, your pumpkin is ready for the next step, ensuring your chips turn out perfectly crisp and flavorful.
Slicing for Even Cooking
Once your pumpkin is cleaned and peeled, it's crucial to slice it uniformly to guarantee even cooking and perfectly crisp chips. Start by cutting the pumpkin into manageable sections, then use a sharp knife to create thin, even slices. Your knife skills will make all the difference here—aim for a uniform thickness of about 1/8 inch to secure consistent results. A mandoline slicer can be a helpful tool if you're aiming for precision. Uneven slices can lead to some chips burning while others remain undercooked, so take your time. Lay the slices flat on a cutting board, checking for any that are too thick or thin. This step sets the foundation for chips that are golden, crispy, and delicious.
Slicing the Pumpkin Thinly
Start by selecting a firm, small sugar pumpkin, as its dense flesh holds up better for thin slicing. Grab a mandoline slicer to guarantee your pumpkin pieces are uniformly thin, about 1/8-inch thick, for even crisping in the air fryer. Adjust the mandoline carefully, keeping your fingers safe, and slice the pumpkin into perfect rounds ready for seasoning.
Choosing the Right Pumpkin
When selecting a pumpkin for making chips, you'll want to choose a smaller variety like sugar pumpkins, as they're sweeter and less fibrous than larger carving pumpkins. These pumpkin varieties are ideal for chips because their flesh is tender and flavorful, perfect for achieving that crispy texture. Look for pumpkins with smooth, unblemished skin and a firm feel—signs of freshness. Seasonal availability plays a role too; sugar pumpkins are typically harvested in the fall, making them easier to find during autumn months. Avoid overly large or decorative pumpkins, as they tend to be stringy and lack the rich flavor needed for chips. A good rule of thumb is to pick one that feels heavy for its size, ensuring it's packed with moisture and sweetness.
Using a Mandoline Slicer
To achieve perfectly thin and even pumpkin slices, a mandoline slicer is your best tool, as it guarantees consistency for even cooking. Set the slicing thickness to about 1/8 inch for chips that crisp up beautifully in the air fryer. Always prioritize mandoline safety by using the hand guard to protect your fingers—those blades are razor-sharp! Hold the pumpkin firmly and slide it smoothly across the blade, letting the mandoline do the work. If you're new to using one, start slowly to build confidence. Uneven slices can lead to some chips burning while others stay soggy, so precision matters. With a mandoline, you'll get uniform slices every time, ensuring your pumpkin chips turn out golden, crunchy, and irresistible.
Seasoning the Pumpkin Slices
After slicing the pumpkin into thin, even pieces, you'll want to season them to bring out their natural sweetness and add a flavorful kick. Start by lightly coating the slices with olive oil or avocado oil to help the spices stick. Then, experiment with spice blends like cinnamon and nutmeg for a warm, autumnal flavor, or try smoked paprika and garlic powder for a savory twist. Don't shy away from bold flavor combinations—a pinch of cayenne paired with brown sugar can create a sweet-and-spicy balance. Sprinkle the seasonings evenly, ensuring each slice gets a taste of the mix. Let the slices sit for a few minutes to absorb the flavors before air frying. This step transforms simple pumpkin into a snack bursting with personality.
Preheating the Air Fryer
Once your pumpkin slices are seasoned and ready, it's time to prepare the air fryer for cooking. Preheating the air fryer is a vital step that guarantees even cooking and crispy results. Set your air fryer to 375°F, a temperature setting that works perfectly for pumpkin chips. Preheating benefits include faster cooking times and a more consistent texture, as the slices hit a hot surface right away. Let the air fryer run for about 3-5 minutes to reach the desired temperature. This step also prevents the pumpkin from sticking to the basket, making cleanup easier. While the air fryer heats up, you'll notice the kitchen filling with a warm, inviting aroma, signaling that it's almost time to cook your chips to golden perfection.
Arranging the Slices in the Air Fryer
When the air fryer is preheated and ready, carefully arrange the seasoned pumpkin slices in a single layer in the basket, making sure they don't overlap. Proper layer arrangement is key to achieving evenly crispy chips, as overlapping slices can trap steam and result in uneven cooking. Take your time to space the slices out, leaving a little room between each one for hot air to circulate. This spacing allows the chips to crisp up uniformly, giving you that perfect crunch. If your air fryer basket is small, work in batches rather than overcrowding—it's worth the extra effort. A well-organized layer arrangement guarantees every slice gets the attention it needs, setting the stage for delicious, golden pumpkin chips.
Cooking the Pumpkin Chips
With the pumpkin slices neatly arranged in the air fryer basket, it's time to cook them to crispy perfection. Set the air fryer to 350°F for ideal temperature control, ensuring even cooking without burning. Slide the basket into the fryer and let the magic begin. The cooking time typically ranges from 10 to 15 minutes, but keep an eye on the slices as they transform. Halfway through, pause the fryer and gently shake the basket to flip the chips, promoting uniform crispiness. The hot air circulates around each slice, drawing out moisture and creating that satisfying crunch. Avoid overcrowding the basket, as this can affect airflow and cooking time. Soon, you'll have golden, crispy pumpkin chips ready to enjoy.
Checking for Crispiness
As the timer nears its end, you'll want to check if your pumpkin chips have reached the perfect level of crispiness. Carefully open the air fryer basket and use tongs to lift a chip. Gently press it between your fingers—it should feel firm and slightly brittle, not soft or pliable. For a more thorough crispiness test, snap a chip in half. If it breaks cleanly with a satisfying crunch, it's ready. If it bends or feels chewy, return the chips to the air fryer for another 2-3 minutes. Keep a close eye to avoid burning. A quick texture check guarantees you achieve that ideal balance of golden edges and a light, airy crunch. Remember, chips will crisp up slightly as they cool, so don't overdo it.
Storing and Serving Tips
Once your pumpkin chips have cooled completely, store them in an airtight container to maintain their crispiness. Choose storage containers with tight-fitting lids to keep moisture out and preserve their texture. For short-term storage, keep them at room temperature, but if you plan to enjoy them later, place the container in the fridge for up to a week. When serving, arrange the chips on stylish serving platters to showcase their golden color and delicate crunch. Pair them with dips like hummus or yogurt for a savory twist, or sprinkle with cinnamon sugar for a sweet treat. Avoid stacking them too high to prevent breakage, and serve immediately to guarantee they stay fresh and crispy. Enjoy your homemade pumpkin chips as a snack or appetizer!
Disclosure: As an Amazon Associate, I earn from qualifying purchases.