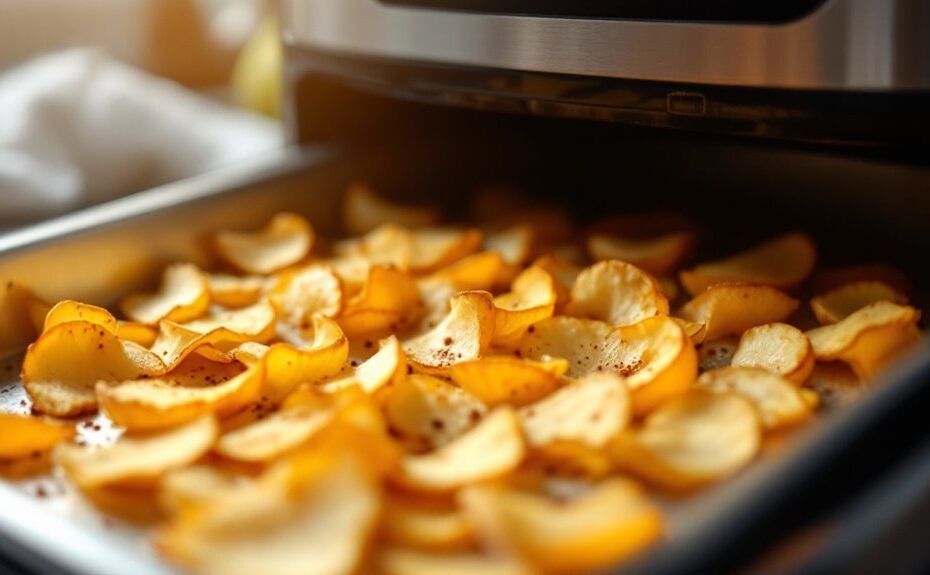
Imagine thin, golden slices of pear transforming into delicate, crispy chips with just a touch of heat. To make air fryer pear chips, you'll need firm pears, a mandoline for precision, and a bit of patience. Start by slicing the pears thinly, then dip them in lemon juice to preserve their color. Preheat your air fryer and arrange the slices in a single layer, ensuring they don't overlap. The key lies in the timing—flip them halfway through to achieve that perfect crisp. But how do you know when they're just right? The answer might surprise you.
Key Takeaways
- Select firm pears like Bosc or Anjou, slice uniformly to 1/8-inch thickness, and dip in lemon juice to prevent browning.
- Preheat air fryer to 300°F (150°C) and arrange pear slices in a single layer without overlapping for even cooking.
- Cook pear slices for 10-15 minutes, flipping halfway through to ensure even browning and crispiness.
- Test for crispiness by pressing a chip; it should feel firm and brittle, with golden edges.
- Cool chips completely on a wire rack, store in an airtight container, and enjoy within 3 days for best texture.
Gather Your Ingredients and Tools
Before you begin, make sure you've got everything you need: 2-3 firm pears (like Bosc or Anjou), a sharp knife or mandoline slicer for thin, even slices, and a small bowl of lemon juice to prevent browning. Start with proper pear selection—choose pears that are firm but ripe, as overly soft ones won't hold their shape during slicing. Use a mandoline slicer or a sharp knife to achieve uniform 1/8-inch slices; this guarantees even cooking and a crisp texture. Dip each slice into lemon juice immediately after cutting to keep them from browning and to add a subtle tangy note. Pat the slices dry with a paper towel to remove excess moisture, which helps them crisp up better in the air fryer.
Choose the Right Type of Pears
Select firm and sweet pear varieties like Bosc or Anjou, as they hold their shape well and caramelize beautifully in the air fryer. Avoid overripe pears, as they'll turn mushy and won't crisp up properly. Their natural sugars will intensify during cooking, giving your chips a perfect balance of sweetness and crunch.
Firm and Sweet Varieties
When making air fryer pear chips, you'll want to pick pears that are firm and sweet, as they hold their shape better and caramelize beautifully during cooking. Opt for pear varieties like Bosc or Anjou, which have a dense texture and rich flavor profiles that intensify when dehydrated. Bosc pears offer a honey-like sweetness and a slightly grainy texture, while Anjou pears provide a balanced sweetness with a smooth, juicy bite. These varieties crisp up evenly in the air fryer, creating a satisfying crunch. Avoid overly soft pears, as they'll turn mushy instead of achieving that perfect chip texture. Slice them thinly and evenly to guarantee consistent cooking, allowing the natural sugars to caramelize and enhance their inherent sweetness.
Avoid Overripe Pears
Overripe pears won't hold up well in the air fryer, turning soft and mushy instead of achieving the crisp texture you're after. When selecting pears, focus on pear ripeness—choose fruits that are firm but slightly yielding near the stem. Overripe pears lack the structure needed to slice thinly and crisp up, resulting in uneven chips that may burn or stick. For fruit selection, opt for varieties like Bosc or Anjou, which maintain their shape better during cooking. Test ripeness by gently pressing the neck; if it gives too much, it's past its prime. Proper pear ripeness secures your chips will dehydrate evenly, creating a satisfying crunch with a hint of natural sweetness. Avoid overly soft pears to guarantee perfect results every time.
Slice the Pears Evenly and Thinly
Start with ripe pears, as they'll slice more easily and caramelize beautifully in the air fryer. Use a mandoline slicer to cut the pears into thin, even slices about 1/8-inch thick, ensuring they crisp up uniformly. Avoid cutting them too thick, or they'll turn chewy instead of achieving that light, crunchy texture.
Choose Ripe Pears
To guarantee your pear chips turn out crisp and flavorful, select pears that are firm yet ripe, with a slight give when gently pressed. Look for pear ripeness indicators like a sweet, fragrant aroma near the stem and a smooth, unblemished skin. Avoid overly soft or mushy pears, as they'll lose their structure during cooking. When selecting perfect pears, opt for varieties like Anjou or Bosc, which hold their shape well and offer a balanced sweetness. Test the ripeness by pressing near the stem; it should yield slightly without feeling squishy. Ripe pears guarantee even slicing and a concentrated flavor after air frying. If your pears are underripe, let them sit at room temperature for a day or two to soften and sweeten naturally.
Use Mandoline Slicer
Once you've selected ripe pears, grab a mandoline slicer to make certain your pear chips are uniformly thin and crisp. Set the mandoline to a 1/8-inch thickness for the perfect balance between crunch and tenderness. Always use the hand guard for mandoline safety, keeping your fingers clear of the blade. Hold the pear firmly and slide it smoothly across the blade using steady, even pressure. Consistent slicing techniques secure even cooking, preventing some chips from burning while others remain underdone. Thin slices will dehydrate faster in the air fryer, creating a delicate, crispy texture with a subtle sweetness. If you don't have a mandoline, use a sharp knife, but aim for the same precision. Uniform slices are key to achieving perfectly golden, chip-like pears.
Preheat Your Air Fryer
Before slicing your pears, preheat your air fryer to 300°F (150°C) to guarantee even cooking and crisp results. Check your air fryer's preheat settings to confirm it reaches the correct temperature, as some models may require manual temperature calibration. Preheating assures the pears dehydrate evenly, enhancing their natural sweetness and creating a satisfying crunch. If your air fryer doesn't have a preheat function, let it run empty for 3-5 minutes at the desired temperature. This step prevents soggy chips and secures consistent texture. Avoid skipping preheating, as it directly impacts the final crispness and flavor. Once the air fryer reaches the right temperature, you're ready to proceed. Proper preheating sets the stage for perfectly golden, caramelized pear chips with a delicate, crispy bite.
Arrange Pear Slices in a Single Layer
Lay the pear slices in a single layer on the air fryer basket, making sure they don't overlap to promote even crisping. Space them slightly apart so hot air circulates freely, enhancing their caramelized edges and tender centers. This technique guarantees each slice cooks uniformly, giving you perfectly golden, crunchy pear chips.
Ensure Even Spacing
To guarantee even cooking and crispiness, arrange the pear slices in a single layer on the air fryer basket, leaving a small gap between each slice. Proper spacing tips make certain that hot air circulates evenly around every slice, preventing soggy spots and promoting a uniformly crisp texture. Aim for even distribution by placing the slices about ¼ inch apart, which allows the air fryer to work efficiently. Overcrowding can trap moisture, leading to uneven results. If your basket is small, work in batches to maintain the right spacing. This technique not only enhances the chips' crunch but also helps them caramelize slightly, bringing out their natural sweetness. Consistent spacing is key to achieving perfectly golden, crispy pear chips every time.
Prevent Overlapping Slices
When arranging pear slices in the air fryer basket, make sure they don't overlap, as this can block airflow and lead to uneven cooking. For overlapping prevention, lay each slice flat in a single layer, guaranteeing they're spaced evenly apart. This slice arrangement allows hot air to circulate freely, crisping the edges while keeping the centers tender. If slices overlap, they'll steam instead of crisp, resulting in a chewy texture rather than the desired light, crunchy chip. Use tongs or your fingers to adjust slices as needed, and work in batches if your air fryer basket is small. Proper slice arrangement guarantees each chip cooks uniformly, enhancing the natural sweetness and caramelized flavor of the pears. This step is vital for achieving perfectly crisp pear chips.
Maximize Airflow Exposure
Properly arranging pear slices in a single layer guarantees even cooking and maximizes airflow exposure. Lay them flat on the air fryer basket, making sure none overlap or touch. This airflow optimization allows hot air to circulate evenly, crisping each slice uniformly. Space the slices about 1/4 inch apart to prevent steaming and promote a crunchy texture. Maintain consistent temperature control by preheating the air fryer to 300°F (150°C) before adding the pears. Cook for 10-12 minutes, flipping halfway through to make certain both sides crisp evenly. Avoid overcrowding, as it traps moisture and leads to soggy chips. Proper spacing enhances caramelization, bringing out the pear's natural sweetness and creating a delicate, golden finish. This technique secures perfectly crisp, flavorful pear chips every time.
Set the Air Fryer Temperature and Time
Preheat your air fryer to 300°F to guarantee even cooking and a crisp texture for the pear chips. This temperature control secures the pears dehydrate slowly, intensifying their natural sweetness while achieving a delicate crunch. Set the cooking duration to 12-15 minutes, depending on the thickness of your slices. Thinner slices will crisp up faster, while thicker ones may need a bit more time. Avoid overcrowding the basket to maintain proper airflow, which is vital for even browning. The low-and-slow approach prevents burning and allows the pears to caramelize slightly, enhancing their flavor. Keep an eye on the chips as they cook, as air fryers can vary in performance. Adjust the time if needed, but don't exceed 300°F to avoid scorching.
Flip the Pear Chips Halfway Through
To guarantee even crisping and prevent any spots from burning, flip the pear chips halfway through the cooking process. Set a timer for half the total cooking time to confirm proper flip timing. Carefully open the air fryer basket and use tongs or a spatula to gently turn each slice over. This step secures even browning on both sides, giving the chips a consistent golden hue and a satisfying crunch. Avoid overcrowding the basket to make flipping easier and to maintain airflow. If some slices stick, loosen them gently to prevent tearing. Flipping also helps redistribute any natural sugars, enhancing the caramelized flavor. Once flipped, close the basket and resume cooking until the chips are perfectly crisp.
Check for Crispiness and Adjust as Needed
After flipping the pear chips, keep a close eye on them as they finish cooking to guarantee they reach the desired level of crispiness. Perform crispiness testing by gently pressing a chip with your finger or tongs—it should feel firm and slightly brittle, not soft or pliable. If they're still too tender, return them to the air fryer in 1-2 minute increments, checking frequently to avoid over-browning. For texture adjustment, you can lower the temperature slightly if the edges are browning too quickly while the centers remain soft. The goal is a golden, evenly crisp chip with a delicate crunch and a sweet, caramelized flavor. Once they're done, remove them immediately to prevent overcooking.
Let the Pear Chips Cool Completely
Once the pear chips are removed from the air fryer, transfer them to a wire cooling rack or a parchment-lined surface to let them cool completely. Cooling benefits include allowing the chips to crisp up further as they lose residual moisture, enhancing their light, crunchy texture. Avoid stacking them while warm, as this can trap steam and make them soggy. Spread them out in a single layer to guarantee even cooling. This step also helps lock in their natural sweetness and subtle caramelized flavor. Proper cooling secures they're ready for storage tips like sealing them in an airtight container to maintain freshness. Patience here is key—rushing this step can compromise their delicate crispness, so give them at least 10-15 minutes to cool fully.
Store or Serve Your Pear Chips Fresh
When your pear chips have cooled completely, you can either serve them immediately for a fresh, crispy snack or store them for later enjoyment. For serving suggestions, pair them with a dollop of yogurt, a drizzle of honey, or a sprinkle of cinnamon for added sweetness. They also make a great topping for oatmeal or salads. If you're storing them, use an airtight container to maintain their crispness. Place a sheet of parchment paper between layers to prevent sticking. Keep them in a cool, dry place for up to three days. For longer storage, freeze them in a single layer before transferring to a freezer-safe bag. Reheat in the air fryer for a few minutes to restore their crunch before serving.
Disclosure: As an Amazon Associate, I earn from qualifying purchases.