You might've stumbled upon a forgotten baguette in your kitchen, and now you're wondering how to turn it into something extraordinary. Air fryer garlic bread is your answer, combining simplicity with bold flavors. Start by whipping up a garlic butter mixture, then spread it generously over evenly sliced bread. Preheat your air fryer, arrange the slices, and let the magic happen. But here's the catch—timing and technique matter more than you'd think. What's the secret to achieving that perfect golden crisp without burning the edges? Stick around, and you'll find out how to elevate this classic side dish effortlessly.
Key Takeaways
- Use a crusty loaf like baguette or ciabatta, softened unsalted butter, fresh garlic, and herbs for a flavorful garlic butter spread.
- Slice bread into ½-inch thick pieces, spread garlic butter evenly, and let it sit briefly to enhance flavor before cooking.
- Preheat the air fryer to 375°F (190°C) and arrange bread slices in a single layer for even cooking and crispiness.
- Cook for 5 minutes, checking halfway, and adjust time in 1-minute intervals to achieve a golden, crispy texture.
- Serve warm immediately to preserve the crunchy crust and soft interior, pairing with dishes or enjoying as a snack.
Gather Your Ingredients
Before you start, make sure you've got all your ingredients ready: a loaf of crusty bread, softened butter, minced garlic, fresh parsley, grated Parmesan, and a pinch of salt. Ingredient selection is key—opt for a fresh, crusty loaf like a baguette or ciabatta for the best texture. Use unsalted butter to control the saltiness, and choose fresh garlic over pre-minced for a more vibrant flavor. For ingredient preparation, let the butter soften at room temperature for easy mixing. Mince the garlic finely to distribute its flavor evenly, and chop the parsley just before use to keep it fresh. Grate the Parmesan yourself for a sharper taste. Having everything prepped guarantees a smooth process and maximizes flavor in every bite.
Prepare the Garlic Butter Mixture
Start by softening your butter to room temperature for easy mixing. Finely mince fresh garlic and chop your favorite herbs, then combine them with the butter for a rich, aromatic base. Season the mixture with a pinch of salt to enhance the flavors before spreading it on your bread.
Soften Butter Properly
To guarantee your garlic butter mixture spreads smoothly, take the butter out of the fridge about 30 minutes before you begin, letting it soften at room temperature. The butter temperature should be cool but pliable, not melted or greasy. Test the butter consistency by pressing it lightly with your finger—it should leave a slight indentation without being too firm or overly soft. If you're short on time, cut the butter into small cubes to speed up softening. Avoid microwaving, as it can create uneven textures or melt the butter, which affects the mixture's spreadability. Properly softened butter guarantees the garlic and herbs blend evenly, creating a rich, flavorful base for your bread. This step is vital for achieving a smooth, cohesive mixture.
Mix Garlic and Herbs
Once your butter is softened, combine it with freshly minced garlic and your choice of herbs, such as parsley, oregano, or thyme, in a small bowl. Use about 2-3 cloves of garlic for a robust garlic infusion, adjusting to your taste. Mix thoroughly to evenly distribute the garlic and herbs, ensuring every bite is packed with flavor. For a balanced herb pairing, stick to one or two herbs to avoid overwhelming the garlic. Use a fork or small spatula to blend until the mixture is smooth and cohesive. This step is essential for creating a rich, aromatic base that will coat the bread evenly. Avoid overmixing, as it can cause the butter to separate. The result should be a fragrant, herbaceous spread ready for the next step.
Season With Salt
After blending the garlic and herbs into the softened butter, season the mixture with a pinch of salt to enhance the flavors. Use a precise salt measurement—about 1/4 teaspoon for every stick of butter—to avoid overpowering the garlic and herbs. Taste the mixture as you go to confirm a proper seasoning balance; it should complement the richness of the butter without dominating the other ingredients. If needed, add salt in small increments, mixing thoroughly after each addition. This step secures the garlic butter has depth and complexity, elevating the final bread. Avoid over-salting, as it can mask the fresh, aromatic qualities of the garlic and herbs. Proper seasoning at this stage guarantees a flavorful, well-rounded spread for your air fryer garlic bread.
Slice the Bread Evenly
Choose a sturdy loaf like a baguette or ciabatta to hold the garlic butter. Use a sharp serrated knife to slice the bread evenly, ensuring each piece is about ½-inch thick for consistent cooking. Uniform slices help the bread crisp up perfectly in the air fryer without burning.
Choose the Right Bread
For the best garlic bread, start with a sturdy loaf like a baguette or ciabatta, as they hold up well in the air fryer. Your bread selection is essential—opt for a loaf type with a firm crust and soft interior to achieve the perfect balance of crispiness and tenderness. Avoid overly soft or thin breads, as they can become soggy or burn easily. A fresh loaf works best, but day-old bread can also yield excellent results if it's still firm. Cut the loaf into even slices, ensuring they're thick enough to support the garlic butter without falling apart. This step sets the foundation for a flavorful, evenly cooked garlic bread that's crispy on the outside and soft in the middle.
Use a Sharp Knife
To guarantee your garlic bread cooks evenly and has a consistent texture, grab a sharp knife and slice the loaf into even pieces. A sharp knife secures clean cuts without tearing the bread, which helps maintain its structure and prevents uneven cooking. Always prioritize knife safety by keeping your fingers tucked and using a stable cutting surface. If your knife feels dull, take a moment for knife maintenance—sharpen it or use a honing rod to restore its edge. Uneven slices can lead to some pieces burning while others remain undercooked, so focus on precision. A well-maintained knife not only makes the task easier but also enhances the final presentation and texture of your garlic bread.
Ensure Uniform Thickness
When slicing your bread for garlic bread, aim for uniform thickness to secure even cooking and a consistent texture throughout. Use a ruler or the markings on your cutting board to measure bread thickness, confirming each slice is about ½ inch thick. Uniform slices allow the garlic butter to penetrate evenly, enhancing flavor distribution. Press the knife firmly but gently to avoid tearing the bread, maintaining clean edges. If your loaf is uneven, trim the ends to create a flat surface before slicing. Consistent bread thickness confirms that every piece crisps up uniformly in the air fryer, avoiding burnt edges or undercooked centers. This technique secures a perfect balance of crunch and softness in every bite.
Spread the Garlic Butter Generously
Once your garlic butter is prepared, grab a butter knife or spatula and spread it evenly over the cut sides of the bread. Use a smooth, consistent motion to guarantee the garlic butter application covers every inch, reaching the edges for maximum flavor. Don't skimp—this is where the rich, savory taste comes from. For the best butter spreading technique, work from the center outward, pressing gently to let the butter seep into the bread's nooks and crannies. If you're using a softer bread, avoid tearing it by applying the butter with a light touch. For a more intense garlic flavor, let the butter sit on the bread for a few minutes before air frying. This step makes certain every bite is packed with buttery, garlicky goodness.
Preheat the Air Fryer
Before placing your garlic bread in the air fryer, preheat it to 375°F (190°C) for about 3-5 minutes. This guarantees even cooking and a crispy exterior. Proper air fryer maintenance, like cleaning the basket and checking for debris, helps maintain temperature accuracy, which is vital for consistent results. If your air fryer has a preheat function, use it; otherwise, simply set the temperature and let it run empty for a few minutes. Avoid overcrowding the basket later, as it can disrupt airflow and affect cooking. Preheating also helps the garlic butter melt evenly, enhancing the bread's flavor and texture. Always double-check your air fryer's temperature settings to avoid undercooking or burning. This step sets the foundation for perfectly golden, aromatic garlic bread.
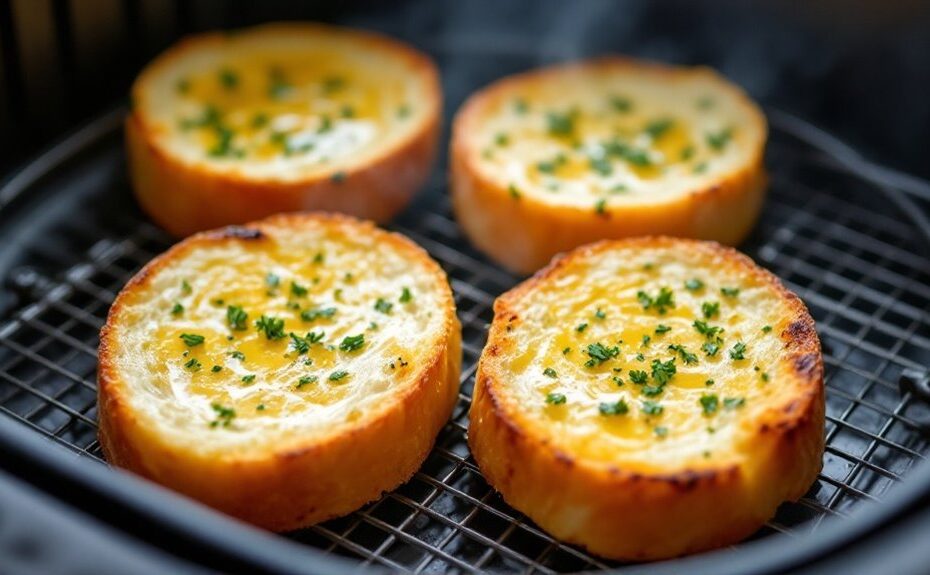
Arrange the Bread in the Air Fryer Basket
Place the garlic bread slices in a single layer in the air fryer basket, making sure they don't overlap. Avoid overcrowding to allow hot air to circulate evenly, which guarantees a crispy, golden finish. Space them out properly for consistent cooking and maximum flavor.
Proper Bread Placement
To guarantee even cooking and maximum crispiness, arrange the bread slices in a single layer in the air fryer basket, leaving a small gap between each piece. Use bread spacing tips to secure proper airflow, which enhances browning and texture. Place the slices flat, avoiding overlap or stacking, as this prevents uneven cooking. Ideal placement techniques involve positioning the bread so it doesn't touch the sides of the basket, allowing hot air to circulate freely. If your basket is small, work in batches rather than cramming slices together. This method guarantees each piece gets evenly crispy edges and a golden, garlicky crust. Proper placement is key to achieving that perfect balance of crunch and softness in every bite.
Avoid Overcrowding Basket
While arranging the bread in the air fryer basket, make sure you don't overcrowd it, as this blocks airflow and leads to uneven cooking. Proper basket spacing tips are key to achieving that golden, crispy texture. Leave at least a half-inch gap between each slice to guarantee air circulation importance isn't compromised. Overlapping slices or stacking them will trap steam, making the bread soggy instead of crisp. If your basket is small, cook in batches rather than cramming everything in at once. This technique guarantees even browning and maximizes flavor by allowing hot air to flow freely around each piece. Remember, spacing isn't just about fit—it's about creating the perfect environment for your garlic bread to crisp up beautifully.
Ensure Even Cooking
Properly arranging the bread in the air fryer basket guarantees each slice cooks evenly and achieves that golden, crispy finish. Place the slices in a single layer, leaving space between them to allow for even heat distribution. Avoid stacking or overlapping, as this can block airflow and lead to uneven browning. If your basket is small, cook in batches to maintain consistent cooking results. For thicker slices, consider flipping them halfway through to make certain both sides crisp up evenly. This technique makes sure the garlic butter soaks into the bread while the exterior becomes perfectly crunchy. By arranging the bread thoughtfully, you'll maximize the air fryer's efficiency and achieve a delicious, evenly cooked garlic bread every time.
Set the Cooking Time and Temperature
Preheat your air fryer to 375°F, which guarantees the garlic bread gets crispy without burning. Proper temperature control secures even browning and prevents the bread from drying out. Set the cooking duration to 5 minutes initially, as air fryers work quickly and can overcook delicate items like garlic bread. If your air fryer has a preheat function, use it to maintain consistent heat. Avoid overcrowding the basket to allow hot air to circulate evenly, enhancing crispiness. Adjust the time slightly if your air fryer runs hotter or cooler than average. This technique confirms the garlic butter soaks into the bread while the exterior turns golden and crunchy. Always monitor the process to achieve the perfect balance of texture and flavor.
Check for Crispiness Midway
After about 2-3 minutes of cooking, pause the air fryer and carefully check the garlic bread for crispiness. Open the basket and gently press the bread with a fork or your finger to test the texture. The crust should feel firm but not overly hard, while the center should remain slightly soft. If it's still too doughy, continue cooking in 1-minute intervals, repeating the crispiness check each time. Avoid overcooking, as it can dry out the bread and diminish its buttery, garlicky flavor. This texture testing secures the perfect balance of a golden, crunchy exterior and a tender, flavorful interior. Adjust the timing based on your air fryer's performance, as models vary. This step confirms your garlic bread achieves the ideal crispiness.
Remove and Let Cool Slightly
Once the garlic bread reaches your desired level of crispiness, carefully remove it from the air fryer using tongs or a spatula. Transfer it to a wire rack or a heatproof plate to allow for even airflow during the cooling time. Let it rest for 2-3 minutes; this short resting period helps the flavors meld and prevents burning your mouth. Avoid stacking the slices, as trapped steam can soften the crust. The cooling time also guarantees the garlic butter sets slightly, enhancing the texture and taste. Use this brief pause to prepare any accompaniments or set the table. Proper cooling guarantees the bread retains its crunch while staying tender inside, delivering the perfect balance of flavors and textures.
Serve Warm and Enjoy
When the garlic bread has cooled slightly, serve it warm to maximize its flavor and texture. The garlic aroma will be at its peak, enhancing the overall taste experience. Slice the bread into portions if you haven't already, ensuring each piece retains its crispy exterior and soft interior. Pair it with your favorite dishes or enjoy it on its own for a satisfying snack. The contrast between the crunchy crust and tender crumb highlights the bread texture, making every bite irresistible. Avoid letting it sit too long, as it may lose its crispiness. Serve immediately to preserve the air fryer's magic, ensuring the garlic butter soaks into the bread perfectly. Enjoy the warm, savory treat while it's fresh and flavorful.
Disclosure: As an Amazon Associate, I earn from qualifying purchases.