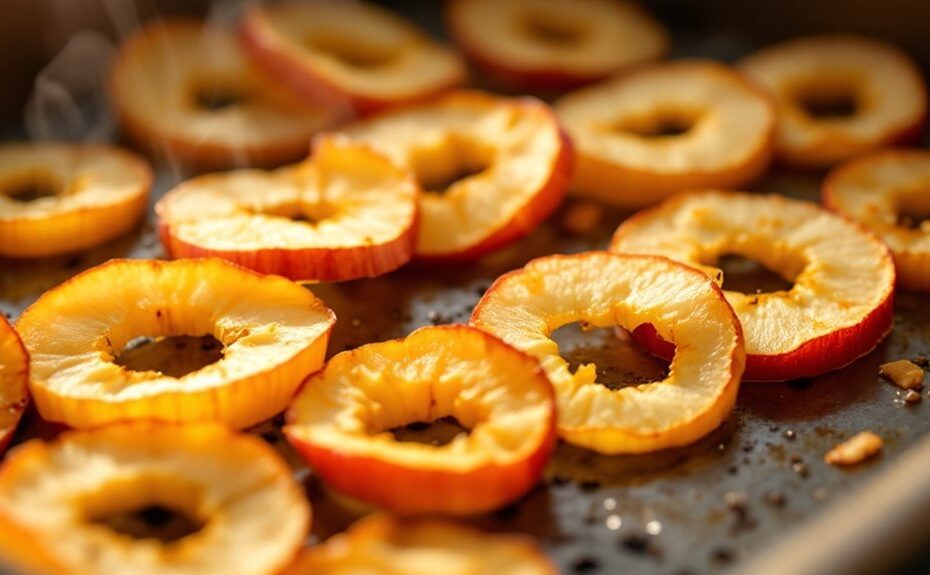
You might not realize that the type of apple you choose can make or break your air fryer apple chips. Firm varieties like Granny Smith or Honeycrisp hold up better during cooking, ensuring a crisp texture. Once you've sliced them uniformly, preheating your air fryer and arranging the slices in a single layer is key. But the real secret lies in the timing and flipping process—get it right, and you'll achieve perfectly golden, crunchy chips. What happens next could change how you snack forever.
Key Takeaways
- Choose firm, sweet apples like Granny Smith or Honeycrisp, slice them uniformly to 1/8 inch, and pat dry for crispiness.
- Preheat the air fryer to 300°F (150°C) and arrange apple slices in a single layer for even cooking.
- Cook apple slices at 300°F (150°C) for 10 minutes, flipping halfway through, and monitor for desired crispness.
- Cool apple chips completely on a wire rack to maximize crispiness before serving or storing.
- Store cooled chips in an airtight container at room temperature for up to three days or freeze for longer freshness.
Choose the Right Apples
When making air fryer apple chips, selecting the right type of apple is essential for achieving the perfect balance of sweetness and crispiness. You'll want to choose apple varieties with a firm texture and a natural sweetness that intensifies as they dehydrate. Granny Smith apples are a popular choice for their tartness and ability to hold shape, while Honeycrisp or Fuji apples bring a sweeter flavor profile to the mix. Avoid overly soft varieties like Red Delicious, as they can turn mushy during cooking. Experiment with different apple varieties to find your preferred flavor profile—some may lean tangy, while others offer a caramel-like sweetness. Remember, the right apple sets the foundation for chips that are both delicious and perfectly crisp.
Wash and Slice the Apples
Now that you've picked the perfect apples, it's time to prepare them for the air fryer. Start by thoroughly washing your apple selection under cool water to remove any dirt or residue. Pat them dry with a clean towel. Next, grab a sharp knife or a mandoline slicer for even, precise cuts. Aim for a slicing thickness of about 1/8 inch—thin enough to crisp up but not so thin that they burn. If you're using a knife, take your time to guarantee uniform slices. Remove the core and seeds, but leave the skin on for added texture and nutrients. Consistent slicing thickness is key to even cooking, so double-check each piece before moving on. Your apples are now ready for the next step!
Soak the Apple Slices
To prevent the apple slices from browning and to enhance their flavor, you'll want to soak them in a simple solution. Mix 1 cup of cold water with 1 tablespoon of lemon juice or apple cider vinegar in a large bowl. This soaking solution adds a subtle tanginess while keeping the apples fresh. Submerge the slices completely, making sure they're evenly coated. Let them soak for about 10 minutes—this soaking duration is enough to preserve their color without making them too soft. If you're working with a lot of slices, you can do this in batches. After soaking, drain the slices and pat them dry thoroughly with a clean kitchen towel or paper towels. This step guarantees they crisp up nicely in the air fryer later.
Preheat the Air Fryer
After soaking and drying your apple slices, it's time to get your air fryer ready. Start by plugging in your appliance and making sure it's clean—proper air fryer maintenance guarantees even cooking and prevents residue buildup. Set the temperature to 300°F (150°C) and let it preheat for about 3-5 minutes. Preheating helps achieve crispy, evenly cooked apple chips while saving energy. For energy efficiency tips, avoid opening the fryer frequently during preheating, as this lets heat escape and prolongs the process. If your model has a preheat setting, use it to save time. Once the air fryer reaches the desired temperature, you're set to arrange the slices. This step makes certain your apple chips cook perfectly, so don't skip it!
Arrange the Slices in the Air Fryer
Once the air fryer is preheated, carefully arrange the apple slices in a single layer on the fryer basket, making sure they don't overlap. Proper layer arrangement is key to achieving evenly crispy chips. Leave a little space between each slice to allow hot air to circulate freely, following spacing tips for the best results. If your air fryer basket is small, work in batches rather than overcrowding—this guarantees every chip cooks uniformly. Lightly spray the slices with oil if desired, but avoid drenching them. A well-organized basket not only promotes even cooking but also prevents slices from sticking together. Take your time with this step; it's worth it for perfectly crisp apple chips. Now, you're ready to move on to setting the temperature and time.
Set the Temperature and Time
When your apple slices are neatly arranged in the air fryer basket, set the temperature to 300°F (150°C) and the timer for 10 minutes. This temperature control guarantees the chips crisp up without burning, while the cooking duration allows the apples to dehydrate evenly. Make sure the slices aren't overlapping too much, as this can affect how they cook. If your air fryer has a preheat function, use it to maintain consistent heat. Keep an eye on the chips as they cook, since air fryers can vary slightly in performance. Adjust the temperature or time if needed, but avoid opening the basket prematurely, as it can disrupt the cooking process. Proper temperature control and cooking duration are key to achieving that perfect, crispy texture.
Flip the Apple Slices Midway
Flip the apple slices halfway through the cooking time to make sure they crisp evenly and avoid burnt edges. Use tongs or a spatula to gently turn each slice, keeping them in a single layer. This step guarantees perfectly golden, crunchy chips every time.
Ensure Even Cooking
To guarantee your apple chips cook evenly and achieve that perfect crispiness, you'll want to flip the slices halfway through the cooking process. After arranging the apple slices in a single layer with even spacing and uniform thickness, set your air fryer timer. When the timer hits the halfway mark, pause the air fryer and carefully flip each slice using tongs or a spatula. This step secures both sides are exposed to the circulating hot air, preventing uneven browning or undercooked spots. Don't overcrowd the basket—leave enough room for air to flow freely around each slice. Flipping also helps maintain that satisfying crunch throughout. Once flipped, resume cooking until the chips are golden and crisp.
Prevent Overcooking Edges
Since the edges of apple slices tend to cook faster than the centers, flipping them midway through the air frying process is key to preventing burnt edges and guaranteeing even crispness. Set your air fryer to 300°F for ideal temperature control, as higher heat can cause uneven cooking. After about 5-7 minutes, pause the air fryer and carefully flip each slice using tongs or a spatula. Pay attention to slice thickness—thinner slices (around 1/8 inch) cook faster and may need flipping sooner. This step guarantees the centers crisp up without the edges becoming overly dark. Keep an eye on the chips during the second half of cooking, as timing can vary based on your air fryer model and apple variety. Perfectly balanced crispness awaits!
Cool the Apple Chips Completely
Once the apple chips are done, let them cool completely on a wire rack to make sure they crisp up properly. Don't rush this step—patience guarantees the perfect crunch. Once cooled, transfer them to an airtight container to keep them fresh and crispy for days.
Ensure Proper Cooling Time
After removing the apple chips from the air fryer, let them cool completely on a wire rack or a flat surface. Spread them out in a single layer to guarantee even cooling and prevent them from becoming soggy. Cooling racks are ideal because they allow air to circulate around the chips, helping them crisp up further as they reach room temperature. Avoid stacking or covering them while they cool, as trapped heat can soften the chips. Patience is key here—wait at least 10–15 minutes for them to cool fully. This step secures your apple chips achieve the perfect crunchy texture before you enjoy or store them. Proper cooling time makes all the difference, so don't rush this vital part of the process!
Store in Airtight Container
To keep your apple chips fresh and crispy, transfer them to an airtight container only after they've cooled completely. Warm chips can trap moisture, making them soggy. Use container types like glass jars, plastic food storage boxes, or resealable silicone bags—just make sure they're truly airtight. Layer the chips gently to avoid crushing them, and consider placing parchment paper between layers if stacking. For storage tips, keep the container in a cool, dry place away from direct sunlight or heat. If you've made a large batch, you can store extras in the freezer for up to a month. Label the container with the date to track freshness. Proper storage guarantees your apple chips stay deliciously crisp for snacking anytime!
Store or Serve Immediately
If you're ready to enjoy your air fryer apple chips right away, serve them warm for a crisp, slightly sweet snack. Pair them with a sprinkle of cinnamon or a drizzle of honey for extra flavor. To serve fresh, transfer the chips to a bowl or plate immediately after they cool slightly, ensuring they stay crunchy. If you're not eating them right away, store safely in an airtight container at room temperature for up to three days. For longer storage, place them in a resealable bag and keep them in the fridge for up to a week. Avoid stacking too many chips together, as this can trap moisture and make them soggy. Re-crisp any softened chips in the air fryer for 1-2 minutes before serving.
Disclosure: As an Amazon Associate, I earn from qualifying purchases.